
You wake up at 2 AM to the sound of dripping. You flip on the light and find your basement floor covered in water, or a dark stain spreading across your ceiling from last night’s storm. Your stomach drops. In that moment, you don’t need a lecture on building science — you need to know exactly what to do right now, before the damage gets worse. This guide walks you through safe, practical temporary repairs you can make tonight, and tells you clearly when to stop and call in the professionals.
Table of Contents
- What you need before starting repairs
- Step-by-step guide to temporary water damage repairs
- Common mistakes and how to avoid them
- Knowing when to call in water damage professionals
- A water damage pro’s candid advice for Chicago homeowners
- Get expert help for lasting water damage restoration
- Frequently asked questions
Key Takeaways
| Point | Details |
|---|---|
| Act quickly, act safely | Address water damage right away but always put personal safety first before repairs. |
| Use the right materials | Have essential supplies on hand for temporary repairs to minimize long-term issues. |
| Know DIY limits | Call professionals for major flooding, hidden leaks, or safety hazards to avoid escalation. |
| Document everything | Take thorough photos and notes for any insurance claims and later restoration work. |
| Professional help prevents future risks | Skilled restoration teams catch hidden hazards and ensure your home is truly safe and dry. |
What you need before starting repairs
After addressing your immediate concerns, it’s crucial to gather the right tools and resources before jumping into any temporary fixes. Rushing in unprepared can turn a manageable situation into a dangerous one.
Safety comes first, always. If water is anywhere near outlets, your electrical panel, or any appliances, shut off the power to that area at the breaker box before you touch anything. Water and electricity together can kill. Don’t assume the area is safe just because the lights still work.
Once you’ve confirmed the area is electrically safe, you need the right gear on hand. Here’s what to pull together:
- Rubber gloves and waterproof boots to protect yourself from contaminated water
- A wet-dry vacuum (shop-vac) for pulling up standing water from hard floors
- A submersible sump pump if you’re dealing with significant basement flooding
- Heavy-duty plastic sheeting and duct tape for covering roof breaches or broken windows
- Buckets, mops, and old towels for soaking up water in tight spots
- Box fans and a portable dehumidifier to start moving air and reducing moisture
- A flashlight or headlamp for checking dark corners, crawl spaces, and under cabinets
- A camera or phone for documenting everything before you touch it
| Tool | Best for | Where to get it |
|---|---|---|
| Wet-dry vacuum | Hard floors, small spills | Hardware store or home center |
| Submersible pump | Basement flooding over 2 inches | Hardware store rental |
| Plastic sheeting | Roof or wall breaches | Any hardware store |
| Dehumidifier | Reducing airborne moisture | Big box store or rental |
| Moisture meter | Finding hidden wet areas | Hardware store |
When it comes to store-bought versus improvised tools, a proper wet-dry vac beats towels and buckets every time for speed. If you don’t own one, most hardware stores in the northwest suburbs like Arlington Heights or Schaumburg have rental options available. For tips on protecting your home before emergencies strike, it’s worth reviewing what proactive measures look like.
Important: Reputable guidance is clear that while homeowners can safely remove small amounts of water themselves, severe damage requires professional restoration crews for correct drying and verification. DIY patching alone is not a substitute for professional assessment.
You can find additional Palatine home water cleanup tips if you want to see how local homeowners handle these first-response situations.
Step-by-step guide to temporary water damage repairs
Once you’ve assembled your toolkit and ensured safety, you can begin executing these temporary repairs in a systematic way. Work through these steps in order — skipping ahead creates more problems than it solves.
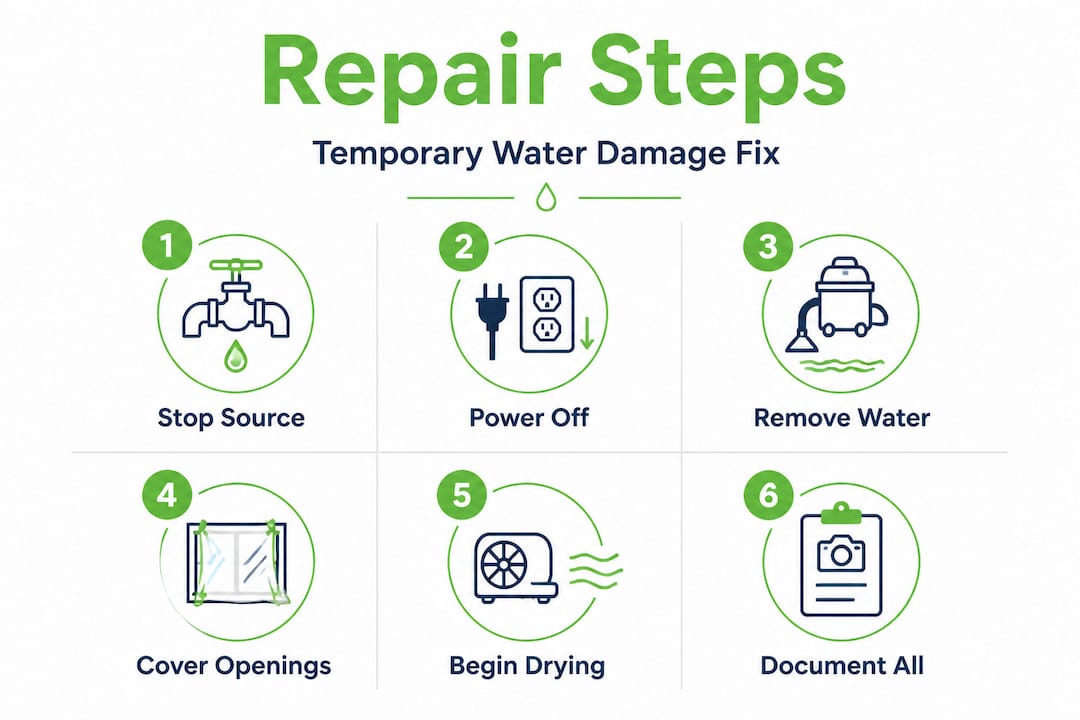
1. Stop the water source immediately.
Find the origin and shut it down. If a pipe burst, locate your main water shutoff valve and close it. In most northwest suburban homes, it’s near the water meter in the basement or utility room. If the water is coming from a roof leak, you can’t stop the rain, but you can redirect the flow by placing buckets and routing water away from walls and electrical fixtures.
2. Disconnect power to wet areas.
Go to your breaker box and switch off circuits serving any room with standing water. Don’t reset them until a professional confirms it’s safe. This step is non-negotiable.
3. Remove standing water as quickly as possible.
Use your wet-dry vac for smaller amounts. For deeper basement flooding, a submersible pump is far more effective and can move hundreds of gallons per hour. The faster you remove standing water, the less it soaks into subfloors, drywall, and insulation. Every hour matters here because delayed water repair dramatically increases the cost and complexity of restoration.
4. Cover roof, wall, or window breaches.
If storm damage created an opening, use heavy plastic sheeting secured with duct tape or roofing nails to create a temporary barrier. Fold the edges over themselves before taping for a stronger seal. For interior ceiling leaks, poke a small hole at the lowest point of a bulging ceiling to drain water in a controlled stream rather than letting it spread and collapse.
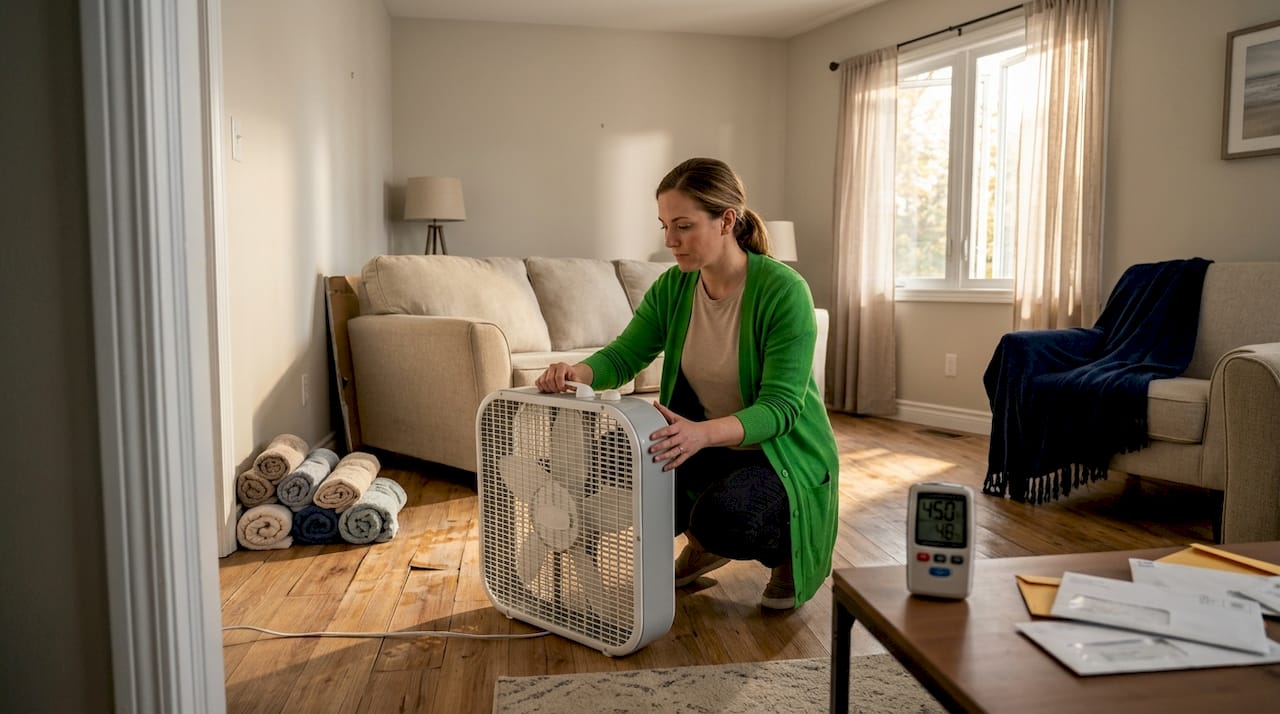
5. Start drying the space immediately.
Open windows if outdoor humidity is lower than indoor humidity. Set up box fans to push moist air out and draw dry air in. Position a dehumidifier in the center of the affected area. Don’t stack furniture against wet walls — pull everything away to allow airflow.
6. Document everything before, during, and after.
Take photos and video of all damage before you move a single item. Photograph standing water depths, stained ceilings, warped floors, and any damaged belongings. This documentation is critical for your insurance claim and for the professional help for water repair team that will assess the situation.
| Action | DIY approach | What pros do differently |
|---|---|---|
| Water removal | Wet-dry vac, buckets | Truck-mounted extractors removing thousands of gallons |
| Drying | Box fans, consumer dehumidifier | Industrial air movers and commercial dehumidifiers |
| Moisture detection | Visual inspection | Thermal imaging and calibrated moisture meters |
| Mold prevention | Fans and bleach | Antimicrobial treatments and verified dry readings |
Pro Tip: Never flip circuit breakers back on yourself after water exposure, and never use a household space heater or hair dryer to speed up drying. Space heaters create fire risks in wet environments, and hair dryers can’t move enough air to matter. Stick to fans and dehumidifiers.
Common mistakes and how to avoid them
With your repairs underway, it’s important to make sure you don’t inadvertently create more problems. These are the errors we see most often, and they’re all avoidable.
Not checking hidden spaces. Water travels. It follows gravity and seeps into wall cavities, under flooring, and into insulation long before you can see it on the surface. After removing visible water, check inside cabinets, behind baseboards, and under rugs. If you have a crawl space, inspect it too.
Relying on bleach to handle mold. Bleach kills surface mold on non-porous materials, but it doesn’t penetrate porous surfaces like drywall or wood. Spraying bleach on a wet wall might kill what you can see while leaving active mold growth hidden inside. Bleach also adds moisture, which can make things worse. Use it sparingly and only on hard, non-porous surfaces.
Premature reoccupancy. Moving back into a water-damaged room before it’s fully dry is a health risk. Wet materials off-gas, mold spores spread, and structural weaknesses aren’t always visible. Give it time and verify dryness before resuming normal use.
Skipping photo documentation. Some homeowners start cleaning before they document. Insurance adjusters need to see the original damage to process your claim fairly. Always photograph first.
Improper disposal of damaged materials. Don’t throw away damaged items before your insurance adjuster or restoration team has seen them. Toss something too soon and you may lose coverage for it.
Warning: As restoration guidance consistently shows, underestimating water damage is one of the most costly mistakes homeowners make. What looks like a surface problem is often hiding structural rot, failed insulation, or mold colonies growing inside walls. Treating it as minor when it isn’t leads to far more expensive repairs down the road.
Pro Tip: Do not reinstall carpet, drywall, or flooring until a professional has verified that the underlying structure is completely dry. Trapping moisture under new materials is a guaranteed recipe for mold. If you’re unsure about choosing a restoration firm, there are specific things to look for that protect your interests.
Knowing when to call in water damage professionals
When you face uncertainty about the extent or safety of your repairs, it’s vital to recognize the line where DIY is not enough. Some situations simply require professional equipment and expertise.
Call professionals immediately if you encounter any of the following:
- Widespread flooding covering more than one room or over two inches deep
- Sewage backup or any water that may be contaminated (gray or black water)
- Electrical systems affected by water, including outlets, panels, or wiring
- Ceiling or floor sagging, which signals structural compromise
- Water in insulation, since wet insulation is nearly impossible to dry effectively at home
- Any sign of mold appearing within 24 to 48 hours of the initial event
- Flooding from an unknown source where you can’t identify or stop the origin
| Situation | DIY appropriate? | Why professionals are needed |
|---|---|---|
| Small appliance leak, limited to tile floor | Yes, with caution | Surface water, no structural risk |
| Burst pipe flooding one room | Partial, then call pros | Hidden moisture in walls and subfloor |
| Basement flooding over 2 inches | No | Volume requires extraction equipment |
| Sewage backup | Never | Contamination hazard, health risk |
| Roof leak with ceiling damage | Temporary cover only | Structural assessment needed |
| Storm flooding with multiple rooms affected | No | Scale and contamination risk |
The long-term damage risks of skipping professional assessment are real and well-documented. Mold can begin forming in as little as 24 hours, and structural damage from prolonged moisture exposure compounds quickly. For homeowners in the northwest suburbs dealing with complex situations, more Palatine water tips offer additional local context. The emergency checklist guidance is consistent: professional drying and verification is not optional for serious water events.
A water damage pro’s candid advice for Chicago homeowners
Here’s something we’ve learned after more than a decade of responding to water emergencies across Schaumburg, Palatine, Barrington, and every suburb in between: people consistently underestimate water damage. Not because they’re careless, but because water damage is deceptive. The surface dries. The floor looks fine. The smell fades after a few days. And homeowners assume the problem is solved.
It almost never is.
Water migrates into places you can’t see without equipment. Insulation holds moisture for weeks. Wood framing absorbs water and stays wet long after the surface feels dry to the touch. We’ve opened walls in homes where the owners thought everything was fine and found active mold colonies that had been growing for months. The homeowner had done everything right on the surface. They just didn’t have the tools to know what was happening behind the drywall.
The other thing we see constantly is the cost of shortcuts. A homeowner patches a ceiling, paints over the stain, and moves on. Six months later, the mold problem that was never treated has spread to adjacent rooms. What would have been a straightforward remediation job becomes a major reconstruction project. The deep water repair risks are not theoretical. We see the results of skipped steps on a regular basis.
Speed matters enormously, but speed without thoroughness backfires. The single most valuable thing a homeowner can do is act fast on the surface steps covered in this guide, and then get a professional in to verify what’s happening beneath the surface. That combination, fast initial response plus professional verification, is what saves money and prevents the kind of damage that disrupts your life for months.
Handy homeowners are great at a lot of things. But drying a structure correctly requires calibrated equipment, moisture readings at multiple depths, and experience knowing where water hides. That’s not a knock on anyone’s skills. It’s just a different kind of problem than most home repairs.
Get expert help for lasting water damage restoration
Temporary repairs buy you time, but they don’t finish the job. If your home in the northwest suburbs has taken on water, the team at Zero Water Restoration is available 24/7 to respond fast, assess the full scope of damage, and get your home back to where it was before everything went wrong.
Whether you’re in Barrington dealing with storm flooding or in Streamwood after a burst pipe, the response process is the same: we get there fast, we use professional-grade equipment to extract and dry completely, and we handle the insurance documentation so you don’t have to manage that on top of everything else. Call (847) 515-7000 for a free inspection and let us take it from here.
Frequently asked questions
What are the first things I should do after my home suffers water damage?
Immediately stop the water source if you can, shut off power to any wet areas, and photograph all damage before touching anything. Reputable emergency guidance also emphasizes calling professionals quickly for anything beyond a minor surface spill.
Can I dry out water-damaged walls and floors myself?
For minor surface leaks you can start the drying process with fans and a dehumidifier, but deep or widespread water requires professional drying equipment and moisture verification to prevent hidden mold, since DIY drying alone rarely reaches moisture trapped inside walls and subfloors.
How can I tell if water damage is too severe for DIY repairs?
If water covers a large area, involves insulation, electrical systems, sewage, or causes any ceiling or floor sagging, those are clear signs to stop and call professionals, as restoration experts consistently note that contamination and structural risks make DIY approaches unsafe in these scenarios.
Is home insurance likely to cover temporary repairs or just permanent restoration?
Most standard homeowner policies cover reasonable emergency actions taken to prevent further damage, so keep every receipt and photograph all temporary repairs you make before your adjuster visits.
How long do I have before mold becomes a problem after water damage?
Mold can begin forming in as little as 24 to 48 hours in wet, warm conditions, which is why fast water removal and ventilation are critical from the very first hour after a water event.