
Standing in a waterlogged room, looking at buckled floors and soaked walls, the sheer scale of what comes next can feel paralyzing. To rebuild after major water damage, you need more than a contractor and some drywall. You need a clear sequence: from drying and documentation through mold inspection, material selection, reconstruction, and insurance claims. This guide covers every phase in plain language, so you can move through the process with confidence and avoid the mistakes that turn a six-week project into a six-month ordeal.
Table of Contents
- Key takeaways
- What the water damage rebuild process actually involves
- A step-by-step guide to executing the rebuild
- Common mistakes that derail the rebuild
- Navigating insurance claims during the rebuild
- What I’ve learned from years of water damage rebuilds
- How Zerowaterrestoration helps you rebuild the right way
- FAQ
Key takeaways
| Point | Details |
|---|---|
| Drying comes first | Never begin reconstruction until moisture readings confirm the structure is fully dry. |
| Documentation drives claims | Photos and moisture readings at every phase protect you from insurance disputes later. |
| Materials matter long-term | Mold-resistant drywall and moisture barriers reduce the risk of future problems. |
| Rebuilds take real time | Major water damage across multiple rooms typically requires 4 to 8 weeks from start to finish. |
| Insurance timing is strategic | Submitting a complete, well-documented scope before demolition prevents costly claim denials. |
What the water damage rebuild process actually involves
Most homeowners use “restoration” and “rebuild” interchangeably, but they are two distinct phases. Restoration, or mitigation, is the emergency response: water extraction, structural drying, and initial containment. The rebuild phase begins only after the structure is confirmed dry and any hazards like mold have been addressed. Mixing these phases up is where many projects go sideways.
The scope of a typical rebuild after major water damage includes removing saturated materials, treating or remediating mold if present, replacing framing or sheathing where structural damage occurred, installing new insulation, and finishing with drywall, flooring, trim, and paint. Rebuild work also includes reinstalling fixtures, cabinetry, and any mechanical components that were affected by the water. It is more involved than most homeowners expect.
Before a single piece of new drywall goes up, three things need to be in place. Your structure must be certified dry by a professional with calibrated moisture meters. Your insurance adjuster must have approved the rebuild scope. And your contractor must have a signed agreement with a clear timeline.
| Rebuild scope item | Why it matters |
|---|---|
| Damaged drywall removal | Wet drywall harbors mold within 24 to 48 hours and cannot be dried in place |
| Subfloor inspection | Hidden moisture under flooring causes rot and mold if not addressed before new floors go down |
| Mold inspection and treatment | Untreated mold spreads to unaffected areas and creates liability for future health issues |
| Framing assessment | Saturated wood framing loses structural integrity and must be replaced or treated before enclosing walls |
| Insulation replacement | Insulation retains moisture invisibly and must be removed even when surrounding materials appear dry |
Pro Tip: Get moisture readings documented in writing before your contractor pulls the first permit. That report becomes part of your insurance file and removes any ambiguity about what work was necessary.
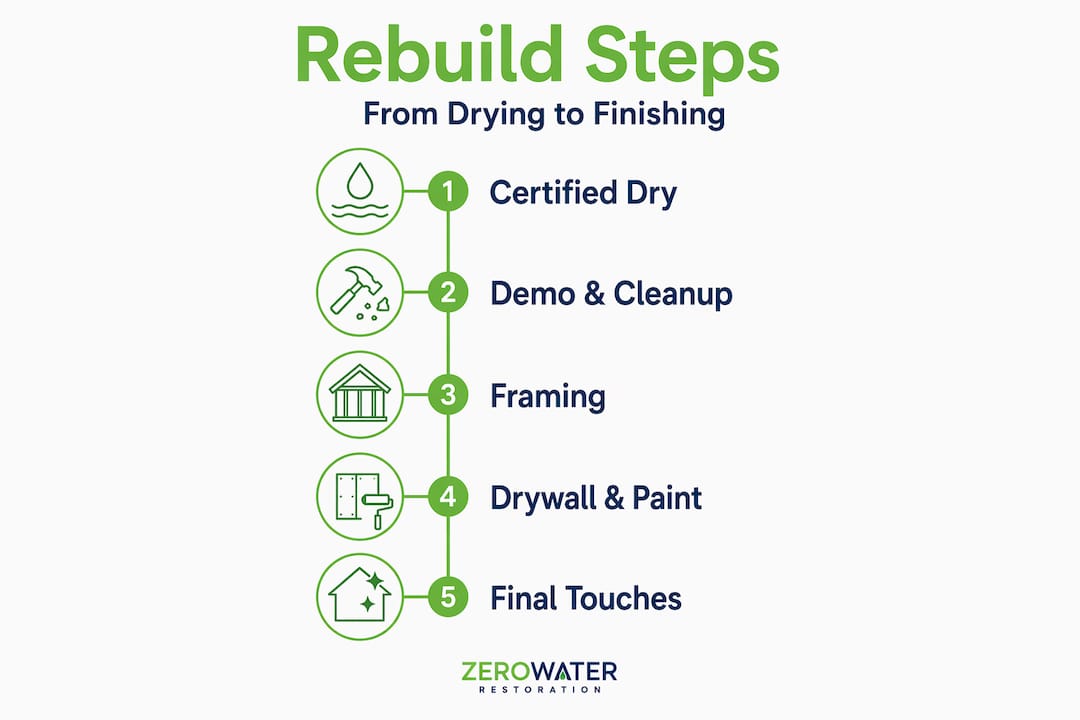
A step-by-step guide to executing the rebuild
Water extraction completed within 24 to 72 hours dramatically limits how far secondary damage spreads. Once extraction and drying are complete, the rebuild sequence follows a predictable order. Skipping steps or reordering them to save time almost always creates more work, not less.
-
Confirm drying is complete. A certified technician takes moisture readings throughout the affected area. Drying alone typically takes 3 to 7 days depending on severity. Do not proceed until readings are within acceptable ranges.
-
Remove all damaged materials. Tear out saturated drywall, insulation, flooring, and subfloor sections as confirmed by your assessment. Photograph everything before and after removal. This documentation is your insurance record.
-
Perform mold inspection and remediation. Once walls are opened, a mold inspection is non-negotiable. If mold is found, remediation must be completed and cleared before any new materials go in. Skipping this step means you are sealing a problem inside your walls.
-
Treat and seal framing. Apply antimicrobial treatment to exposed framing. Let it dry fully before installing insulation. This is a 24 to 48 hour window most contractors overlook when rushing a schedule.
-
Install new insulation. Use insulation appropriate for the area. In below-grade spaces or high-humidity rooms, closed-cell spray foam is worth the added cost because it does not absorb moisture.
-
Hang mold-resistant drywall. Mold-resistant drywall such as purple board or green board, combined with an antimicrobial primer, significantly reduces the risk of future mold growth. Insurance frequently approves these upgrades after a water loss event.
-
Apply primer and paint. Use a moisture-blocking primer on all new drywall before finish coats. This is not optional in areas that experienced flooding.
-
Install moisture barriers and underlayment. Before any flooring goes down, install the appropriate moisture barrier for the floor type. Hardwood over a bare subfloor without a vapor barrier is an invitation for warping within a year.
-
Lay new flooring. Schedule this last. Flooring is the most visible element of the rebuild and should be installed only after everything above it is clean, dry, and finished.
-
Reinstall fixtures, trim, and cabinetry. Final touches come last. This phase moves quickly if the earlier steps were done correctly.
Pro Tip: Build a two-day buffer between each trade on your schedule. Painters waiting on drywall finishers, and flooring crews waiting on painters, is the single most common cause of timeline blowups on residential rebuilds.
A typical multi-room rebuild generally requires 5 to 6 weeks when accounting for drying, demolition, framing, drywall, paint, and flooring. Budget for delays. Mold discovery and insurance approval hold-ups are the two most frequent causes of extended timelines.
Common mistakes that derail the rebuild
The most expensive mistake homeowners make is rushing the drying phase. It feels like nothing is happening when dehumidifiers are running and walls look dry to the touch. But starting repairs before drying completes dramatically raises the risk of mold growth inside closed walls, which means tearing everything out again weeks later. That patience gap costs people thousands of dollars every year.
Here are the other mistakes that show up again and again, along with how to prevent them:
-
Installing flooring over a wet subfloor. The subfloor looks and feels dry but moisture readings tell a different story. Always verify with a meter before flooring goes down, not after.
-
Skipping mold-resistant materials. Standard drywall and basic primer are cheaper upfront. But in a room that experienced water intrusion, they are a false economy. The upgrade to moisture-resistant materials typically costs 10 to 15 percent more and lasts significantly longer.
-
Incomplete photo documentation before demolition. Failure to document before you remove damaged materials gives your insurer grounds to question whether those materials actually needed replacement. Take photos and video before anything comes out.
-
Ignoring unexpected mold found mid-rebuild. When a contractor opens a wall and finds mold, some homeowners ask them to “just paint over it and keep moving.” That approach violates most building codes and voids many insurance policies. Stop, remediate properly, and move on.
-
Assuming the insurance adjuster’s scope is complete. Adjusters work from what they can see. If they did not open the walls, they may have missed damage. A restoration company that advocates on your behalf can identify gaps in the approved scope before you are stuck paying out of pocket.
Pro Tip: Keep a written log of every conversation with your adjuster, including dates, names, and what was discussed. If a dispute arises, that log is often the difference between getting reimbursed and paying the difference yourself.
Navigating insurance claims during the rebuild
Good documentation is not just helpful for insurance claims. It is the foundation of a successful one. Photos, moisture readings, and written repair scopes submitted to your insurer at each phase of the project keep claims moving and reduce the back-and-forth that stalls rebuilds. The restoration process documentation needs to happen in real time, not reconstructed after the fact.
Understanding the insurance timeline helps you plan the rebuild realistically. Here is what to expect at each stage:
| Insurance claim milestone | Typical timeline | What you need ready |
|---|---|---|
| Initial claim filing | Day 1 to 2 after damage | Photos, video, written damage description |
| Adjuster inspection | 3 to 7 days after filing | Access to all affected areas, moisture reports |
| Scope approval | 1 to 3 weeks after inspection | Contractor estimates, material specs |
| Supplement filing (if needed) | After demolition reveals hidden damage | New photos, updated contractor scope |
| Payment processing | 1 to 4 weeks after scope approval | Signed contractor agreement |
One area where homeowners consistently lose money is in the supplement process. When demolition exposes damage the adjuster did not see during the initial inspection, you can and should file a supplement claim. This requires new documentation: fresh photos, updated moisture readings, and a revised contractor scope. Do not skip this step. That hidden damage is legitimately covered in most standard homeowner policies.
Working with a restoration company that handles insurance communication directly, as Zerowaterrestoration does for every project, removes the guesswork from this process and keeps the rebuild moving on schedule.
What I’ve learned from years of water damage rebuilds
I’ve seen homeowners go through this process the hard way and the right way. The difference almost always comes down to patience in the first two weeks and communication throughout the rest. When someone rushes the drying phase because they want their home back quickly, they usually end up living elsewhere for longer, not shorter.
What I’ve also learned is that most homeowners underestimate the rebuild timeline by half. They hear “a few weeks” and expect to be back to normal in 30 days. But a whole-floor loss can run 4 to 8 weeks even when everything goes right. When insurance supplements are needed or materials are back-ordered, add more time. Setting realistic expectations upfront prevents enormous frustration midway through.
The other thing I would tell anyone going through this: the rebuild phase is not just about replacing what broke. It is your one opportunity to put better materials in, fix things that were never quite right, and come out of a bad situation with a stronger home. That mindset shift changes how people experience the whole process.
Choose contractors who communicate in writing, pull permits, and are willing to coordinate with your insurer. Transparency from every party on the project is worth more than the lowest bid.
— Jim
How Zerowaterrestoration helps you rebuild the right way
When you are dealing with water damage across multiple rooms, the last thing you want is to manage three separate contractors, chase your insurance adjuster, and figure out which drywall product is mold-resistant. Zerowaterrestoration handles the complete process from emergency water extraction through final reconstruction, so nothing falls through the cracks. Their team documents every phase to support your water damage insurance claim and works directly with adjusters to keep approvals moving. If you are in the northwest suburbs of Chicago and need expert help from day one, explore their water damage restoration services or call (847) 515-7000 for a free inspection.
FAQ
How long does a major water damage rebuild take?
Major damage affecting multiple rooms typically takes 4 to 8 weeks, including drying, demolition, and full reconstruction. Insurance approval and mold remediation can extend that timeline.
Can I start rebuilding before the insurance adjuster visits?
You can make temporary repairs to prevent further damage, but avoid removing or replacing materials before the adjuster documents the loss. Undocumented demolition can give insurers grounds to deny portions of your claim.
What materials should I use when repairing water damage?
Use mold-resistant drywall such as purple or green board, antimicrobial primer, moisture-resistant underlayment for flooring, and closed-cell insulation in high-humidity areas. These upgrades are commonly approved by insurance after a water loss event.
When is mold remediation required during a rebuild?
Mold remediation is required any time mold is discovered during demolition, which is common when water was present for more than 24 to 48 hours. Remediation must be completed and cleared before new materials are installed.
What is the water damage rebuild process in simple terms?
The rebuild process follows drying and mitigation. It includes removing damaged materials, inspecting for mold, replacing framing and insulation, installing mold-resistant drywall, and finishing with flooring, paint, and fixtures, all coordinated with insurance approval at each stage.