
Most homeowners assume water damage restoration is just cleanup. Get the water out, dry the floors, move on. That assumption is exactly how a burst pipe becomes a $30,000 repair bill. The water damage restoration process explained properly is a multi-phase operation covering assessment, extraction, drying, sanitation, mold remediation, and full reconstruction. Understanding each stage puts you in control when every hour counts. This guide walks Illinois homeowners and property managers through the complete process so you know what to expect, what to ask, and how to avoid the mistakes that turn manageable emergencies into expensive disasters.
Table of Contents
- Key takeaways
- The water damage restoration process explained from start to finish
- Drying, dehumidification, and moisture monitoring
- Cleaning, sanitizing, and mold remediation
- Repair, reconstruction, and the finishing stages
- Insurance documentation and your responsibilities
- My honest take after years in this industry
- Zero Water Restoration is here when it counts
- FAQ
Key takeaways
| Point | Details |
|---|---|
| Speed is everything | Early intervention is the single most critical factor in reducing restoration cost and damage severity. |
| Drying is not the finish line | Mitigation ends after drying, but property is not restored until reconstruction is complete. |
| Water type changes everything | Clean, gray, and black water each require different sanitation protocols and disposal methods. |
| Document before you clean | Timestamped photos, moisture logs, and written scopes are your best protection against insurance disputes. |
| Mold waits for no one | Mold can begin growing in as little as 24 to 48 hours, making same-day response non-negotiable. |
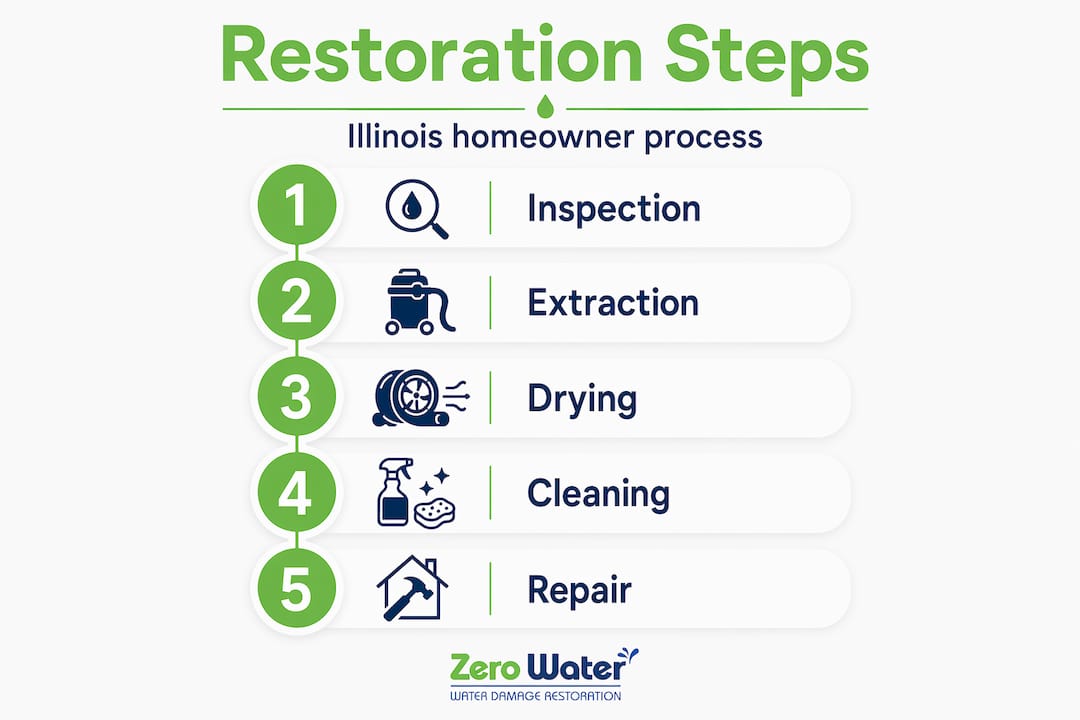
The water damage restoration process explained from start to finish
When a restoration crew arrives at your property, they are not reaching for mops. They are reaching for moisture meters and thermal imaging cameras. That distinction tells you everything about how professional restoration actually works.
Initial inspection and damage assessment
The first step is a thorough inspection of both visible and hidden moisture. Professionals use moisture meters and thermal imaging to locate water that has migrated behind walls, under subfloors, and into ceiling cavities. Water travels fast and far. What looks like a wet patch on the carpet may be a soaked wall cavity two rooms away.
The crew will also classify the water source, because the category of water determines every subsequent decision about cleaning and safety protocols. They document the scope before touching anything.
Here is what that initial phase covers:
- Source control: Shutting off the water supply, whether that means turning a valve or coordinating with your utility provider
- Safety check: Identifying electrical hazards, structural instability, or contamination risks before entering affected areas
- Moisture mapping: Using thermal cameras and pin-type meters to trace the full extent of water migration
- Damage classification: Categorizing water type and damage level to inform the restoration plan and insurance estimate
Pro Tip: Before the crew arrives, photograph everything from multiple angles. Timestamped photos taken before any cleanup begins are critical. About 25% of insurance disputes stem from inadequate documentation, not actual coverage gaps.
Water extraction and emergency mitigation
Once the source is controlled and the scope is mapped, extraction begins. Industrial truck-mounted pumps and portable wet vacuums pull standing water from floors, carpets, and wall cavities. This step is not slow or gentle. Speed matters because hidden structural damage accelerates with every additional hour of exposure.
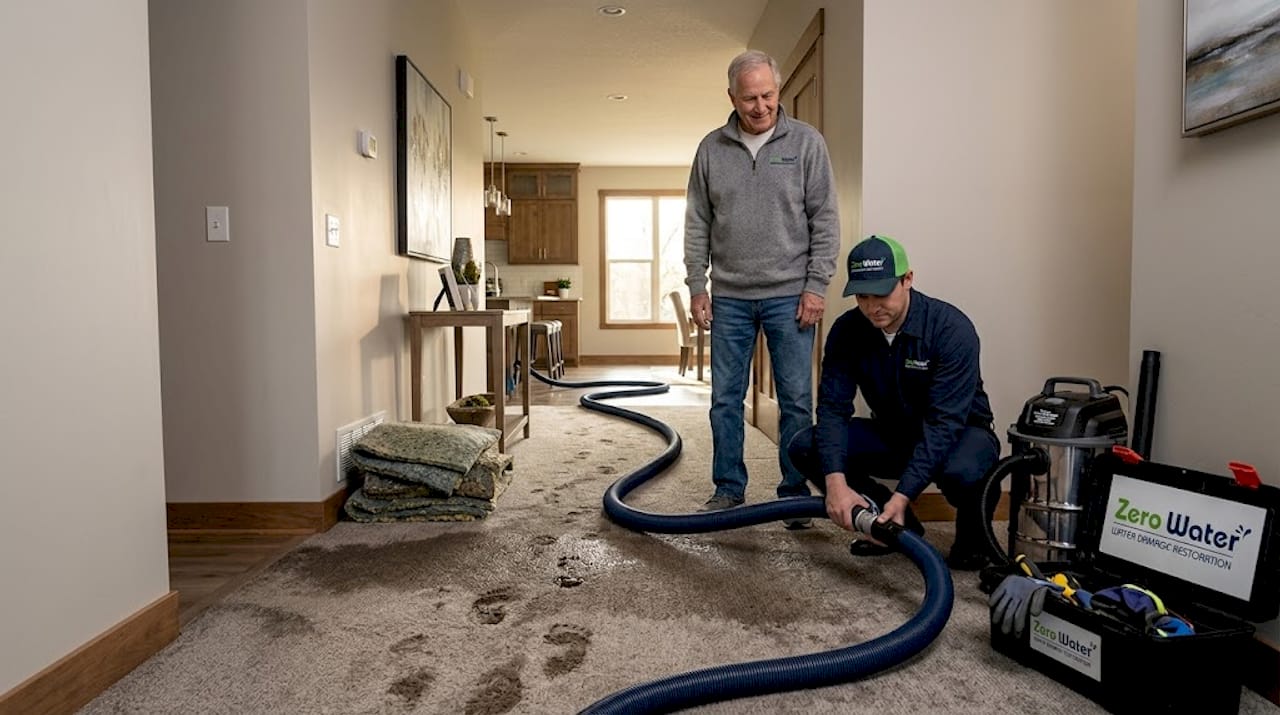
Professionals will also remove saturated materials that cannot be salvaged. Carpet padding almost always goes. Drywall below the waterline often goes. Insulation behind walls goes. These removals are not destruction. They are the difference between drying a structure in three days versus trapping moisture inside for weeks.
Drying, dehumidification, and moisture monitoring
Extraction removes bulk water. Drying removes what remains in the materials themselves, and that process is slower and more technical than most homeowners expect.
Professional crews set industrial air movers and dehumidifiers throughout the affected area. Air movers force surface moisture to evaporate. Dehumidifiers pull that moisture from the air and discharge it as condensate. The system works together, and it needs to run continuously until readings hit target levels.
Here is how the drying phase typically unfolds:
- Equipment placement: Air movers and dehumidifiers are positioned based on the moisture map to maximize airflow through saturated cavities.
- Daily monitoring: Technicians return each day to check moisture readings with sensors and adjust equipment placement as materials dry unevenly.
- Material decisions: If drywall or flooring cannot reach safe moisture levels within the drying window, it gets removed. Trapping wet material behind sealed walls is how mold problems start.
- Documentation: Moisture readings are logged daily, creating a record that supports your restoration timeline and insurance claim.
- Clearance: Drying is complete when all materials reach acceptable moisture levels verified by calibrated instruments, not by feel or appearance.
Restoration timelines vary significantly. Small contained areas may dry in one to two days. Major flooding involving multiple rooms or structural systems can take one to three weeks before reconstruction can begin.
Pro Tip: Ask your restoration crew for daily moisture logs in writing. This record is one of the top water damage documentation tools for insurance claims and protects you if the adjuster questions whether drying was thorough.
The equipment used in this phase matters. Industrial dehumidifiers, air movers, and thermal imaging sensors are what separate professional restoration from renting a box fan from a hardware store. Consumer equipment simply cannot move enough air volume or pull enough moisture to dry a structure properly.
Cleaning, sanitizing, and mold remediation
Once materials are dry, cleaning and sanitation begin. The protocols here depend heavily on what type of water caused the damage.
| Water category | Source | Sanitation requirements |
|---|---|---|
| Category 1 (Clean) | Broken supply lines, appliance overflow | Standard cleaning and drying; low contamination risk |
| Category 2 (Gray) | Washing machine discharge, toilet overflow without solids | Antimicrobial treatment; some porous materials removed |
| Category 3 (Black) | Sewage backup, floodwater, standing water | Full removal of porous materials; heavy-duty disinfection required |
Different water categories require fundamentally different approaches. Black water from sewage backup is treated as a biohazard. Every porous surface it touched gets removed and disposed of properly. You cannot simply dry and paint over sewage contamination.
After sanitation, crews apply antimicrobial and deodorizing treatments to affected surfaces. These treatments inhibit future microbial growth and address the musty odors that persist even after visible water is gone.
Mold remediation is often where homeowners get surprised. Mold can begin growing within 24 to 48 hours of water exposure. By the time visible mold appears, it has likely been growing inside wall cavities for days. Licensed mold remediation involves:
- Containment of affected areas to prevent spore spread during removal
- Physical removal of mold-contaminated materials
- HEPA vacuuming and surface treatment of remaining structural elements
- Air quality testing to confirm successful remediation before rebuilding begins
Skipping or rushing this phase is one of the most expensive mistakes homeowners make. Encapsulating mold behind new drywall does not solve the problem. It guarantees a larger, more expensive problem in six months.
Repair, reconstruction, and the finishing stages
This is the phase most homeowners do not see coming. Drying and cleaning are complete. Now the property needs to be rebuilt to its pre-loss condition. This is where the water damage remediation vs restoration distinction becomes real.
Mitigation ends after drying. Standard cleaning and drying services do not automatically include replacing baseboards, drywall, flooring, or fixtures unless a full restoration contract was established upfront. That gap between “dried out” and “livable again” is where confusion and frustration typically peak for homeowners.
Reconstruction may include:
- Drywall installation, taping, mudding, and painting
- Flooring replacement or refinishing depending on material type
- Cabinetry and trim repair
- Plumbing fixture reinstallation
- Structural repairs if framing was compromised
The timeline for this phase depends on the severity of damage, contractor availability, and material lead times. A single-room repair might take a week. Multi-room or structural damage can extend for months.
Pro Tip: Before you sign any contract, ask explicitly whether it includes build-back. A water damage restoration estimate guide should break out mitigation costs and reconstruction costs separately. If a quote does not distinguish between the two, ask for that breakdown in writing before work begins.
Homeowners regularly underestimate the scope and timeline of the post-drying phase, which leads to miscommunication and frustration. Setting clear expectations with your restoration company on day one prevents most of that stress.
Insurance documentation and your responsibilities
Your insurance company will not pay for what you cannot prove. That reality shapes everything about how you should behave in the first 24 hours after water damage.
Before any cleanup happens, document the entire scene:
- Photograph everything from multiple angles, including close-ups of affected materials and wide shots showing room context
- Record video walkthroughs narrating what you see and when it was discovered
- Note the date and time the damage was first observed and what caused it
- Save all damaged items until the adjuster has seen them or photographed them yourself
- Request written scopes from your restoration company detailing every action taken and every material removed
Documentation is the foundation of a viable insurance claim. Insurance companies routinely challenge claims that lack clear evidence. Proper documentation also accelerates carrier approvals and reduces back-and-forth with adjusters.
A good restoration company will generate a detailed scope of work that functions as your water damage restoration estimate guide for the adjuster. This scope includes line-item pricing, photos, moisture logs, and material quantities. When you navigate water damage insurance claims for Illinois homeowners, having this documentation from day one keeps the process moving.
Keep written records of every conversation with your adjuster. Follow up phone calls with emails summarizing what was discussed. This paper trail protects you if coverage questions arise later.
My honest take after years in this industry
I’ve watched homeowners make the same mistakes over and over, and almost all of them come down to waiting too long or trusting surface appearances.
The biggest one I see: people assume drying is done when the floors feel dry to the touch. Floors can feel dry while wall cavities behind them still read 30% moisture. That residual moisture is where mold colonies form. By the time the smell hits, you are looking at remediation costs that dwarf what proper drying equipment would have cost.
I’ve also seen homeowners get frustrated when they receive a restoration estimate and realize the rebuild is not included. This is not a contractor trying to add charges. It reflects a real distinction in the industry between mitigation and full restoration. Read every contract carefully. Ask what is and is not covered before work starts, not after.
The insurance piece surprises people too. Many homeowners assume their adjuster is handling documentation. Your adjuster is evaluating your claim, not building it. That responsibility is yours, or belongs to the restoration company you hire to help you. Choose a company that knows how to work through insurance claims and takes that burden seriously.
— Jim
Zero Water Restoration is here when it counts
If you are dealing with water damage in the northwest suburbs of Chicago, Zerowaterrestoration handles the entire process from the initial emergency call through final reconstruction. The team responds 24/7 because water damage does not wait for business hours. Whether you are in Barrington or Lake Zurich, Zerowaterrestoration brings professional assessment tools, certified drying equipment, licensed mold remediation, and full build-back capabilities to every job. The team also works directly with your insurance provider, managing documentation, communicating with adjusters, and keeping your out-of-pocket costs as low as possible. Call (847) 515-7000 or visit zerowaterrestoration.com for a free inspection and estimate.
FAQ
What are the main stages of water damage restoration?
The water damage restoration process typically moves through six stages: inspection and moisture mapping, water extraction, structural drying, cleaning and sanitation, mold remediation if needed, and reconstruction. Each stage depends on the one before it.
How long does the full restoration process take?
Small contained jobs can be completed in a few days, while major flooding may take several weeks or longer. Timelines depend on water category, extent of damage, and how quickly mitigation begins.
What is the difference between mitigation and full restoration?
Mitigation stops the damage and dries the structure. Full restoration returns the property to its pre-loss condition including reconstruction. Mitigation contracts often do not include rebuild work unless explicitly stated.
How do I document water damage for my insurance claim?
Take timestamped photos and video before any cleanup begins, save damaged materials until your adjuster has reviewed them, and request a written scope of work from your restoration contractor. Proper documentation significantly reduces the risk of claim disputes or denials.
When does mold become a concern after water damage?
Mold can start growing within 24 to 48 hours of water exposure, which is why same-day professional response is critical. Visible mold on surfaces usually means growth has already been active inside walls or under floors for days.