
A burst pipe, a roof failure during a storm, a sprinkler system malfunction at 3 AM. These aren’t hypotheticals for most property managers and business owners. They’re the calls that turn a normal day into a crisis. The commercial water damage cleanup steps you take in the first hours after water intrudes your building determine how much you spend on repairs, how long your tenants or operations are disrupted, and whether you end up with a mold problem six weeks later. This guide walks you through each phase of the water damage recovery process so you can act with confidence, not panic.
Table of Contents
- Key takeaways
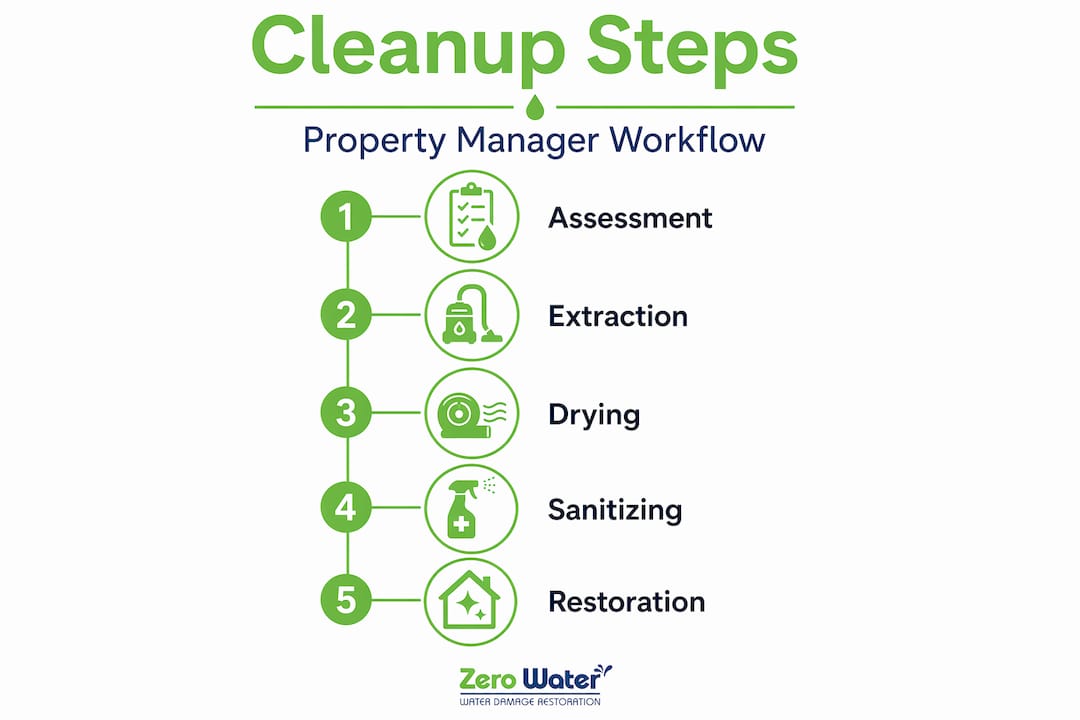
- Commercial water damage cleanup steps: starting with assessment
- Step 1: water extraction and removal
- Step 2: drying and dehumidification
- Step 3: cleaning, sanitizing, and mold prevention
- Step 4: post-drying inspection and restoration planning
- What I have learned from commercial water damage cleanup
- Get your facility restored fast with Zero Water Restoration
- FAQ
Key takeaways
| Point | Details |
|---|---|
| Speed is everything | Mold can begin growing within 24–48 hours, making immediate extraction the single most critical action. |
| Document before you touch anything | Photos, moisture readings, and written logs protect your insurance claim and prevent costly disputes. |
| Water type determines the approach | Clean, gray, and black water each require different extraction and sanitization protocols. |
| Drying is not the same as dry | Industrial dehumidifiers and moisture meters confirm actual dryness, not just the absence of visible water. |
| Professional involvement cuts costs | Early engagement with a certified restoration team reduces secondary damage and accelerates recovery timelines. |
Commercial water damage cleanup steps: starting with assessment
Before anyone touches a mop or plugs in a pump, you need a clear picture of what you are dealing with. Skipping the assessment phase is the single most common mistake property managers make. It leads to missed damage, unsafe conditions, and insurance headaches that could have been avoided.
Conduct a room-by-room damage assessment
Walk the property systematically. Start from the source of the water intrusion and work outward. Note which surfaces, materials, and systems are affected. Professional assessment techniques identify hidden moisture inside wall cavities and under flooring that visual inspection misses entirely.
Secure the site and address safety hazards
Water and electricity are a life-threatening combination. Shut off power to affected areas before anyone enters. Check for structural concerns like sagging ceilings, compromised floors, or load-bearing walls showing signs of saturation. If you have any doubt about structural stability, keep people out until a professional confirms it is safe.
Here is what you need before cleanup begins:
- Identify and shut off the water source to stop further intrusion
- Cut power to affected zones and verify with a non-contact voltage tester
- Document all visible damage with photos and video before moving anything
- Note moisture readings in adjacent rooms, not just the primary damage area
- Assemble personal protective equipment: gloves, N95 respirators, waterproof boots, eye protection
Pro Tip: Detailed damage documentation including timestamped photos, moisture meter readings, and written condition notes will support your insurance claim and protect you if any disputes arise with adjusters later.
| Item | Why it matters |
|---|---|
| Moisture meter readings | Establishes baseline for tracking drying progress |
| Timestamped photos and video | Provides proof of pre-remediation conditions for insurers |
| Written damage log | Supports regulatory compliance and contractor coordination |
| Water source documentation | Establishes cause of loss for insurance classification |
Delaying restoration increases repair costs significantly, so your goal at the assessment stage is speed combined with accuracy. Get in, get the full picture, and move fast.
Step 1: water extraction and removal
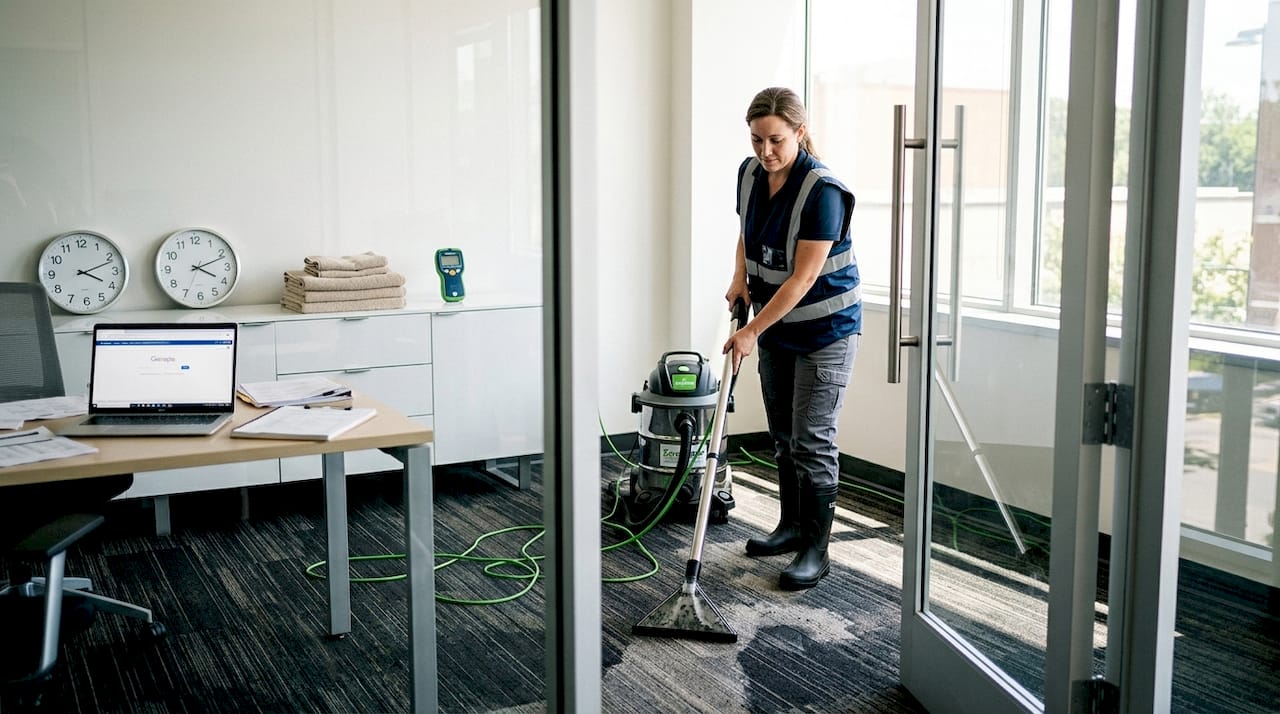
Water extraction is where the real work begins. This phase of the commercial flood cleanup procedure has more impact on your final outcome than any other. The faster standing water is removed, the less it saturates building materials, the less it spreads, and the lower your mold risk.
Not all water is the same. The water category matters when deciding how to extract and handle it:
- Category 1 (clean water): Originates from a clean source like a supply line break. Lower health risk but still requires immediate removal.
- Category 2 (gray water): Contains contaminants from sources like dishwashers, sink overflows, or HVAC condensation. Requires protective handling.
- Category 3 (black water): Sewage backups, flooding from outside, or any water that has sat long enough to become grossly contaminated. This requires full protective gear and specialized disposal protocols.
The extraction method depends on the category, volume, and affected surfaces. Wet/dry vacuums work for smaller areas and residual moisture. Submersible pumps handle significant standing water in basements or low-lying areas. Truck-mounted extraction units are the fastest and most powerful option for large commercial spaces.
Work from the least damaged areas inward toward the primary zone of saturation. This prevents you from tracking contaminated water into areas that were previously clean. Pull carpet and pad immediately if they are saturated. Category 2 or 3 water makes carpet essentially unsalvageable in most commercial settings.
Pro Tip: After visible standing water is removed, do a second pass with extraction equipment over all flooring. Subflooring and concrete slabs hold significantly more water than they appear to, and that moisture will wick back up into your replacement materials if not addressed.
Mold risk grows sharply after the 24 to 48 hour window following water intrusion. In a commercial building with high foot traffic, HVAC circulation, and porous construction materials, that window closes fast. Extraction speed is not a preference. It is a necessity.
Step 2: drying and dehumidification
Extraction removes standing water. Drying removes the water that has absorbed into your building. These are two completely different problems requiring two completely different tools. Most business water damage response plans underestimate how long and intensive the drying phase actually is.
Industrial air movers are placed strategically to create directional airflow across wet surfaces. They work in combination with commercial-grade dehumidifiers that pull moisture from the air as it evaporates from wet materials. This is not something you achieve with box fans from a hardware store.
Key considerations during the drying phase include:
- Target indoor relative humidity below 50 percent to inhibit mold growth
- Use a calibrated moisture meter to check walls, floors, and ceilings daily. Do not rely on touch or visual appearance.
- Expect drying times between 3 and 5 days for moderate commercial water damage. Large-scale flooding may require 7 to 10 days of continuous equipment operation.
- Remove materials that cannot be dried within the recovery window. Wet materials that cannot dry quickly should be removed to prevent mold establishment.
- Adjust HVAC settings carefully. Running your building’s HVAC during drying can spread moisture to unaffected zones if not managed properly.
Pro Tip: Your HVAC system is a liability during active drying. HVAC systems can become mold conduits when moisture enters the ductwork. Disable the central system in affected zones and use standalone drying equipment until clearance is confirmed.
Moisture content benchmarks matter. For wood framing, the target is below 19 percent moisture content. Concrete and masonry have different baselines depending on the material. A credible restoration team will provide daily moisture logs so you can track drying progress and confirm when each material has reached acceptable levels.
Step 3: cleaning, sanitizing, and mold prevention
Once surfaces are dry, or are actively being dried, the sanitization phase of your office water damage restoration begins. This step is frequently rushed or skipped by property managers trying to cut costs. That shortcut almost always leads to mold problems and repeat remediation expenses.
Sanitizing commercial surfaces requires antimicrobial treatments matched to the material type and the category of water that affected it. Hard, non-porous surfaces like concrete, tile, and metal can be cleaned and treated effectively. Porous materials present a much bigger challenge:
- Drywall: Drywall that has been saturated with gray or black water should be cut out, not dried in place. The paper facing absorbs contaminants and becomes a mold substrate even after it appears dry.
- Carpet and pad: Saturated commercial carpet in a Category 2 or 3 loss is almost never worth saving. The cost and risk of attempting restoration outweigh replacement.
- Ceiling tiles: Drop ceiling tiles that have absorbed water should be replaced. They are inexpensive and carry mold risk if retained.
- Wood framing and subfloor: Evaluate on a case-by-case basis with moisture readings. Wood can often be saved with thorough drying and antimicrobial treatment if addressed quickly.
- HVAC registers and ductwork: Clean and inspect after any flood event. Moisture in ductwork requires professional attention.
According to EPA water remediation guidance, the remediation process involves characterization, decontamination, and clearance phases that often overlap in complex commercial settings.
If visible mold growth appears during cleanup, stop the work and call a certified mold remediation professional. Disturbing active mold colonies without proper containment spreads spores through your HVAC system and into areas that were previously clean.
When professional mold remediation becomes necessary, containment barriers, air scrubbers with HEPA filtration, and negative air pressure protocols are required. This is not a situation for improvisation.
Step 4: post-drying inspection and restoration planning
The final phase of the steps for water mitigation confirms that the work actually succeeded. Too many property managers skip this phase entirely and proceed straight to reconstruction. What you do not verify, you cannot guarantee.
Final clearance involves taking moisture readings across all affected materials and comparing them against baseline levels. EPA-approved clearance sampling confirms when a property is safe to return to regular occupancy and operations. For commercial properties, this documentation also supports your insurance claim and any regulatory compliance requirements tied to your lease or building code.
| Action | Timing | Purpose |
|---|---|---|
| Final moisture verification | After drying phase completes | Confirm all materials have reached acceptable moisture levels |
| Clearance sampling | Before reconstruction begins | Verify absence of mold and contaminants for occupancy safety |
| Restoration scope documentation | Concurrent with clearance | Define what requires repair, replacement, or reconstruction |
| Stakeholder communication | Before and after clearance | Keep tenants, staff, and insurers informed of timeline and status |
| 30-day follow-up inspection | One month post-restoration | Confirm no secondary moisture issues or mold development |
Your restoration timeline should include a written scope of repairs that separates what was salvaged from what was replaced. This matters for insurance documentation, future property disclosures, and long-term maintenance planning.
What I have learned from commercial water damage cleanup
I have seen property managers handle this situation brilliantly, and I have seen them make decisions that turned a two-week remediation into a three-month reconstruction. The pattern that separates those outcomes is almost always the same. It comes down to whether they treated the cleanup as a structured operational response or as a reactive scramble.
The biggest myth I encounter is that commercial water damage cleanup is something a maintenance team can handle with shop vacs and dehumidifiers from a big-box store. I understand the instinct. You want to control costs. But consumer-grade equipment moves a fraction of the air volume and moisture capacity of commercial units. What looks dry to the eye is often still saturated at 30 to 40 percent moisture content inside the wall. That moisture feeds mold colonies you will not see for another four to six weeks.
The second costly pattern I see is inadequate documentation at the start. Every property manager who has fought with an insurance adjuster about coverage scope wishes they had spent twenty minutes taking thorough photos and moisture readings before anyone touched anything.
Speed matters enormously. But organized speed beats panicked speed every time. Call in professionals early, document everything, and do not sign off on completion until you have clearance readings in hand.
— Jim
Get your facility restored fast with Zero Water Restoration
When water hits a commercial property, every hour counts. Zero Water Restoration provides 24/7 emergency response throughout the northwest suburbs of Chicago, including Schaumburg, Arlington Heights, Palatine, and the surrounding area. Their certified technicians arrive with professional-grade extraction and drying equipment, handle the full scope of the water damage restoration process, and work directly with your insurance provider to manage documentation and claims from start to finish.
Whether you are managing a Streamwood commercial property or a facility anywhere in the greater Chicagoland area, Zero Water Restoration delivers the organized, professional response that protects your building, your tenants, and your bottom line. Call (847) 515-7000 for a free inspection and emergency response, available any hour of the day.
FAQ
What are the first commercial water damage cleanup steps to take?
Immediately stop the water source, shut off power to affected areas, and document all damage with photos and moisture readings before beginning extraction. Speed in the first hour significantly reduces total restoration costs.
How quickly does mold develop after commercial water damage?
Mold can begin growing on wet materials within 24 to 48 hours of water intrusion. This makes immediate extraction and drying the most time-sensitive priorities in the entire cleanup process.
When should a commercial property manager call a professional restoration company?
Call a certified restoration company immediately after securing the site. Professional equipment, trained personnel, and proper documentation are most valuable in the first hours. Early involvement reduces secondary damage and total recovery costs.
What is the difference between water extraction and drying?
Extraction removes standing and pooled water using pumps and vacuums. Drying uses industrial air movers and dehumidifiers to remove moisture that has been absorbed into floors, walls, and ceilings. Both steps are required for complete remediation.
How do I know when commercial water damage cleanup is complete?
Completion is confirmed through final moisture meter readings across all affected materials and, when required, clearance sampling using EPA-approved methods. Visual appearance alone is not a reliable indicator of dryness or safety.