
Water damage drywall repair is defined as the process of restoring gypsum board that has been weakened, stained, or contaminated by moisture intrusion. The right repair method depends on three factors: the extent of damage, the water contamination category, and whether the gypsum core remains structurally sound. Examples of water damage drywall repair range from sanding a surface stain and applying stain-blocking primer to cutting out entire wall sections and replacing insulation. Mold colonization begins within 24–48 hours in wet porous materials like drywall. That window is short, and choosing the wrong repair method makes it shorter.
1. Examples of water damage drywall repair: surface stains and small patches
Minor drywall water damage is defined as surface-level discoloration, hairline cracks, or bubbled paint where the gypsum core stays firm and dry. This is the most common scenario after a small roof drip or a slow pipe leak caught early. Surface stains on firm drywall require light sanding, a stain-blocking primer, and repainting to restore the wall.
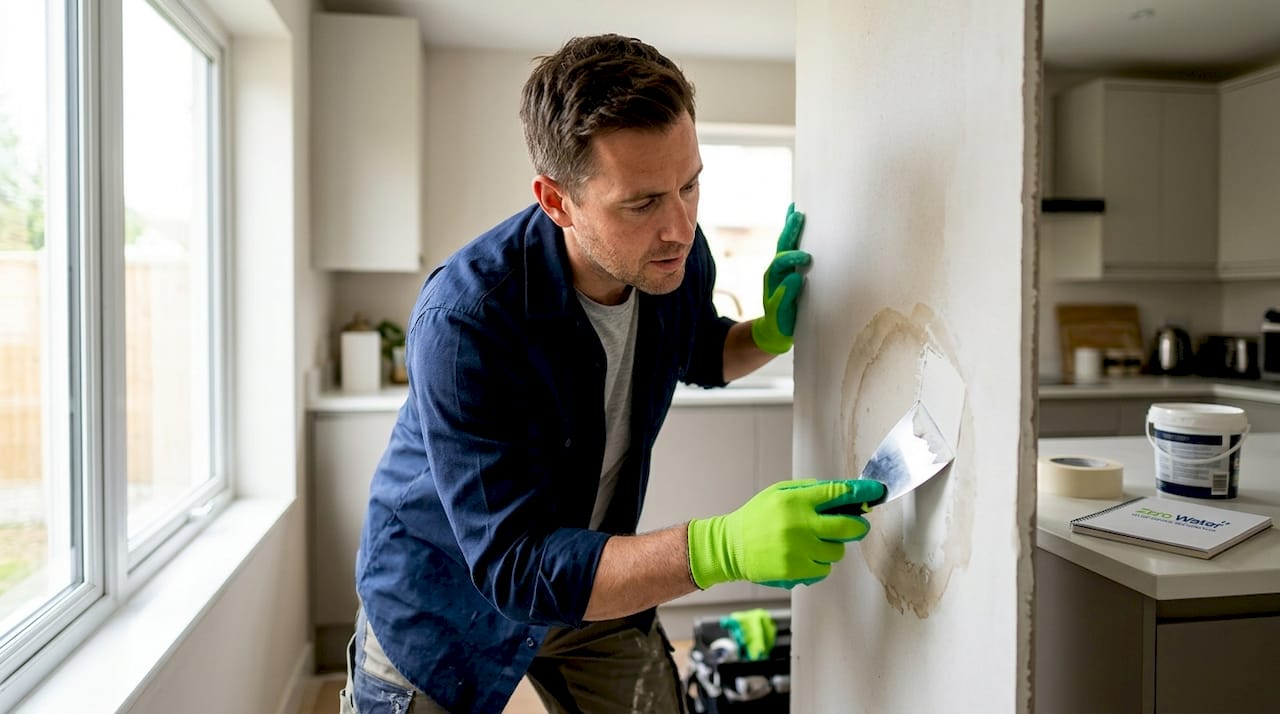
The firmness test is the first step every homeowner should run. Press your thumb firmly against the affected area. Soft or spongy drywall indicates the gypsum core has broken down and the panel must be replaced, not patched. Firm drywall that passes the press test is a candidate for DIY repair.
The repair process for minor damage follows these steps:
- Dry the wall completely before touching the surface. Use fans and a dehumidifier for at least 48 hours.
- Sand the stained area lightly with 120-grit sandpaper to remove loose paper fibers.
- Apply a stain-blocking primer such as Zinsser BIN or Kilz Original to seal the water stain.
- Skim coat with joint compound if the surface is uneven, then sand smooth once dry.
- Paint with a matching finish coat.
Pro Tip: Use a pin-type moisture meter to confirm the wall reads below 15% moisture content before priming. Painting over hidden moisture traps water behind the finish and causes the stain to reappear within weeks.
Category 1 clean water damage addressed within 48 hours with firm drywall can be dried and patched rather than replaced. Beyond that window, the risk of mold and structural breakdown rises sharply.
2. Examples of moderate water damage drywall repair: flood cuts and section replacement
Moderate drywall water damage occurs when the gypsum core softens, paint blisters across a large area, or discoloration extends well beyond a small stain. A burst pipe in a Schaumburg basement or a roof leak after a heavy Illinois storm typically produces this level of damage. The repair method here is a flood cut, which is the industry term for removing drywall to a specific height above the water line to expose the wall cavity for drying.
Flood cuts are made 12–24 inches above the visible water line, and sometimes at 4 feet when insulation must be replaced. That height is not arbitrary. Water wicks upward through porous drywall well beyond where the stain stops, so cutting only to the stain line leaves hidden moisture inside the wall.
The moderate repair process works in this sequence:
- Score and cut the drywall at the flood cut height using a utility knife or oscillating tool.
- Remove the damaged drywall panels and bag them for disposal.
- Pull out any wet insulation. Saturated fiberglass or cellulose insulation cannot be dried effectively and must be replaced.
- Set up air movers and a commercial dehumidifier to dry the wall cavity. Professional drying takes 2–5 days with proper equipment.
- Inspect the framing for mold or rot before closing the wall.
- Install new drywall panels, tape seams, apply joint compound in two or three coats, sand, prime, and paint.
Pro Tip: Cut to the nearest stud bay width and align your cut height with a standard drywall sheet dimension. Flood cuts aligned with drywall sheet widths simplify patch fitting and finishing, which reduces labor time and improves the final result.
Here is how flood cut heights compare in practice:
| Cut Height | Best Used When | Insulation Replacement |
|---|---|---|
| 12 inches above stain | Minor flooding, no insulation contact | Usually not needed |
| 24 inches above stain | Moderate flooding, some wicking detected | Often needed |
| 4 feet above stain | Significant flooding, full insulation saturation | Always required |
3. Examples of severe water damage drywall repair: full replacement and mold remediation
Full drywall replacement is required when the damage involves Category 2 or Category 3 water, visible mold growth, or structural compromise of the gypsum core. Category 2 water includes gray water from washing machines or dishwashers. Category 3 is black water from sewage backups or floodwater. Drywall exposed to Category 2 or 3 water must be removed and replaced regardless of how firm it feels, because contamination penetrates the gypsum and paper facing.
The health hazards are real. Contaminated drywall harbors bacteria, pathogens, and mold spores that spread through HVAC systems and affect air quality throughout the home. Patching over contaminated panels is not a cost-saving measure. It is a liability.
The full replacement process includes:
- Complete demolition of all affected drywall and insulation in the impacted zone.
- HEPA vacuuming of the framing, subfloor, and wall cavity to remove debris and spores.
- Application of an EPA-registered antimicrobial solution to all exposed framing surfaces.
- Thorough drying of the wall cavity, confirmed with a moisture meter before reconstruction begins.
- Installation of new insulation, new drywall, taping, mudding, sanding, and painting.
“Proper water damage restoration prioritizes moisture removal in the wall cavity to prevent repeated damage and mold growth, rather than just cosmetic repair.” — restoration industry standard practice
Restoration costs reflect the severity of this work. Small clean water drywall repairs cost $350–$600, while full mold-related remediation runs $3,000–$5,500. Those numbers make the case for acting fast and calling a professional before a moderate problem becomes a severe one. Homeowners dealing with mold alongside drywall damage should review professional mold remediation services before attempting any DIY work.
4. Comparison of drywall water damage solutions: which repair fits your situation
Choosing the right drywall water damage solution depends on five variables: damage size, water contamination category, gypsum integrity, mold presence, and how long the drywall stayed wet. Getting one of those wrong leads to a repair that fails within months.
| Repair Method | Best For | Approximate Cost | Timeline |
|---|---|---|---|
| DIY patch and prime | Firm drywall, Category 1 water, stain under 6 inches | Under $50 in materials | 1–2 days |
| Professional patch | Firm drywall, Category 1, larger stain area | $350–$600 | 1–2 days |
| Flood cut replacement | Softened drywall, moderate flooding, no contamination | $600–$1,500 | 3–7 days |
| Full replacement with remediation | Category 2/3 water, mold present, structural damage | $3,000–$5,500 | 1–2 weeks |
Patches fail when moisture is trapped behind walls, causing bubbling paint, peeling, and mold reappearance. This is the most common mistake homeowners make. They see a dry surface and assume the wall is ready to finish. The gypsum core and the wall cavity tell a different story.
A few situational rules that hold up in practice:
- Handle a single water stain smaller than a dinner plate yourself if the drywall is firm and the source is fixed.
- Call a professional any time the damaged area spans more than one stud bay or the water sat for more than 48 hours.
- Never patch over drywall that smells musty. That odor signals active mold growth inside the wall. Learn more about preventing mold after a leak before the problem compounds.
- Evaluating the gypsum core, not just the surface, determines whether drywall can be saved. Saturation alters its fire resistance and structural integrity in ways that are not visible from the outside.
For temporary fixes while waiting for a professional, Zerowaterrestoration has a guide on temporary water damage repairs that covers safe short-term steps.
Key Takeaways
The most effective drywall water damage repair starts with assessing the gypsum core, confirming the water contamination category, and drying the wall cavity completely before any finishing work begins.
| Point | Details |
|---|---|
| Firmness test first | Press the drywall to check the core. Soft panels must be replaced, not patched. |
| Contamination category decides the method | Category 2 and 3 water always require full replacement, regardless of surface condition. |
| Cut beyond the stain line | Remove drywall 12–24 inches above visible damage to address hidden moisture wicking. |
| Dry the cavity before closing | Wall cavities need 2–5 days of professional drying before new drywall goes up. |
| Cost scales with delay | Acting within 48 hours keeps repairs in the $350–$600 range. Waiting pushes costs to $5,500 or more. |
What 10 years of drywall repairs taught me about getting it right the first time
The single most expensive mistake I see Illinois homeowners make is finishing a wall before the cavity is dry. The surface looks fine. The paint goes on smooth. Then six weeks later the bubbling starts, and now you have a mold problem on top of a drywall problem.
The firmness test and a moisture meter are not optional steps. They are the whole decision. I have seen walls that looked destroyed on the surface but had a perfectly intact gypsum core underneath. I have also seen walls that looked like minor staining but were completely soft two inches in. You cannot judge drywall by its face paper.
Illinois winters add a layer of complexity that restoration guides written for warmer climates miss entirely. Cold exterior walls slow drying times significantly. A wall cavity that would dry in three days in july can take five or six days in january because the temperature differential pulls moisture toward the cold exterior sheathing. Professional equipment accounts for this. A box fan from the hardware store does not.
My honest advice: if the water source was anything other than a clean supply line, call a professional before you touch the wall. The cost difference between a proper flood cut repair and a full mold remediation is significant. The difference between a proper repair and a patch job that fails is even larger. Spray foam insulation, as noted by building restoration specialists, can also reduce the moisture infiltration that leads to these problems in the first place. Prevention beats repair every time.
— Jim
Zerowaterrestoration serves Illinois homeowners with full-scope drywall repair
Water damage to drywall rarely stays contained to one wall. By the time you see the stain, moisture has usually traveled further than the visible damage suggests.
Zerowaterrestoration handles the full process from water extraction through drywall reconstruction for homeowners across the northwest suburbs of Chicago. The team serves Barrington, Lake Zurich, Streamwood, Schaumburg, Arlington Heights, and surrounding communities with 24/7 emergency response. For homeowners in Barrington dealing with moderate to severe drywall damage, local restoration services are available around the clock. The team also works directly with insurance adjusters to document damage and manage claims, keeping your out-of-pocket costs as low as possible. Call (847) 515-7000 or visit zerowaterrestoration.com for a free inspection.
FAQ
What is drywall water damage?
Drywall water damage is the deterioration of gypsum board caused by moisture intrusion, which weakens the gypsum core, causes surface staining, and creates conditions for mold growth. Severity ranges from minor surface stains to full structural failure depending on water volume and exposure time.
When should I replace drywall instead of patching it?
Replace drywall when it feels soft or spongy, when it was exposed to Category 2 or 3 contaminated water, or when mold is visible. Soft or crumbly drywall cannot regain structural integrity after saturation and must come out.
How long does drywall water damage repair take?
Minor patch repairs take one to two days. Flood cut replacements with cavity drying take three to seven days. Full replacement with mold remediation typically takes one to two weeks depending on the extent of contamination and drying conditions.
Can I repair water-damaged drywall myself?
DIY repair works for small, firm, stain-only damage from a clean water source addressed within 48 hours. Any damage involving soft drywall, contaminated water, or mold requires professional remediation to avoid recurring problems and health risks.
How much does water-damaged drywall repair cost?
Small clean water repairs cost $350–$600, while full mold-related remediation runs $3,000–$5,500. Addressing damage within 48 hours is the most reliable way to keep costs at the lower end of that range.