
Disturbing mold without proper protection is not just messy. It can release up to 1,000,000 spores per square inch of visible contamination, and fungal fragments that break free during cleanup can outnumber those spores by 320 to 1. For homeowners and property managers, understanding the role of containment in mold remediation is the difference between fixing a problem and spreading it through every room in your building. This guide breaks down how containment works, what professional strategies look like, and how you can make sure the job gets done right the first time.
Table of Contents
- Key Takeaways
- The role of containment in mold remediation explained
- Professional mold containment strategies and best practices
- What happens when containment fails
- Post-remediation verification and clearance testing
- How to ensure proper containment on your project
- My honest take on what most people get wrong
- Professional mold remediation for Chicagoland homeowners
- FAQ
Key Takeaways
| Point | Details |
|---|---|
| Containment stops spore spread | Physical barriers and negative air pressure keep mold particles from migrating to unaffected areas during cleanup. |
| HVAC sealing is non-negotiable | Unsealed vents act as highways for spores, distributing contamination throughout the entire building. |
| Negative pressure must be verified | Industry standards require at least negative 5 Pascals of pressure, confirmed with a manometer. |
| Post-remediation testing matters | Verification testing before barriers come down is the only reliable way to confirm the space is safe to reoccupy. |
| Moisture source must be fixed | Containment without addressing the original moisture source guarantees that mold will come back. |
The role of containment in mold remediation explained
Most people picture containment as a few sheets of plastic taped over a doorway. The reality is far more technical, and the stakes for getting it wrong are far higher than most homeowners realize.
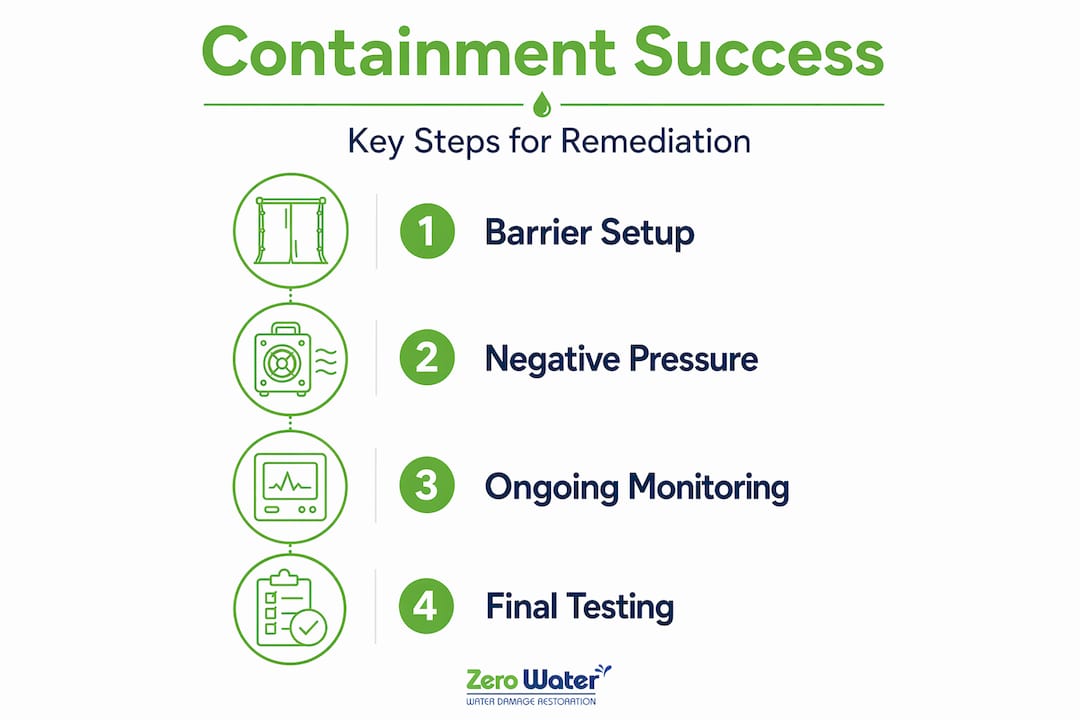
At its core, containment means physically isolating the work zone so that mold spores, fungal fragments, and contaminated dust cannot travel to clean areas during remediation. That requires three things working together: physical barriers that seal the space, negative air pressure that prevents contaminated air from escaping, and sealed air pathways that block secondary routes like HVAC systems and electrical outlets.
The science behind this matters. Mold spores are microscopic, typically between 2 and 100 microns in diameter, and they stay suspended in air for hours once disturbed. Without containment, they travel through open doorways, ride air currents created by HVAC systems, and hitch rides on the clothing of workers moving in and out of the space. What starts as a contained problem in a basement bathroom can become a building-wide air quality issue within a single workday.
Industry standards from IICRC S520 define containment requirements based on the size of the contaminated area. Smaller jobs may qualify for limited containment, but areas exceeding 100 square feet trigger full containment requirements. Key factors these standards address include:
- The number of polyethylene sheeting layers required (double-layer for full containment)
- Mandatory decontamination chambers, also called airlocks, for worker entry and exit
- Negative air pressure maintenance and verification
- HVAC isolation protocols for the affected zone
Mold can establish colonies in concealed areas within 48 to 72 hours of moisture exposure. Once you understand how fast contamination grows and how easily spores travel when disturbed, the importance of mold containment stops being an abstract concept. It becomes urgent.
Professional mold containment strategies and best practices
Knowing what proper containment looks like helps you evaluate contractors and protect your property. Here is how trained professionals set up effective mold containment zones.
-
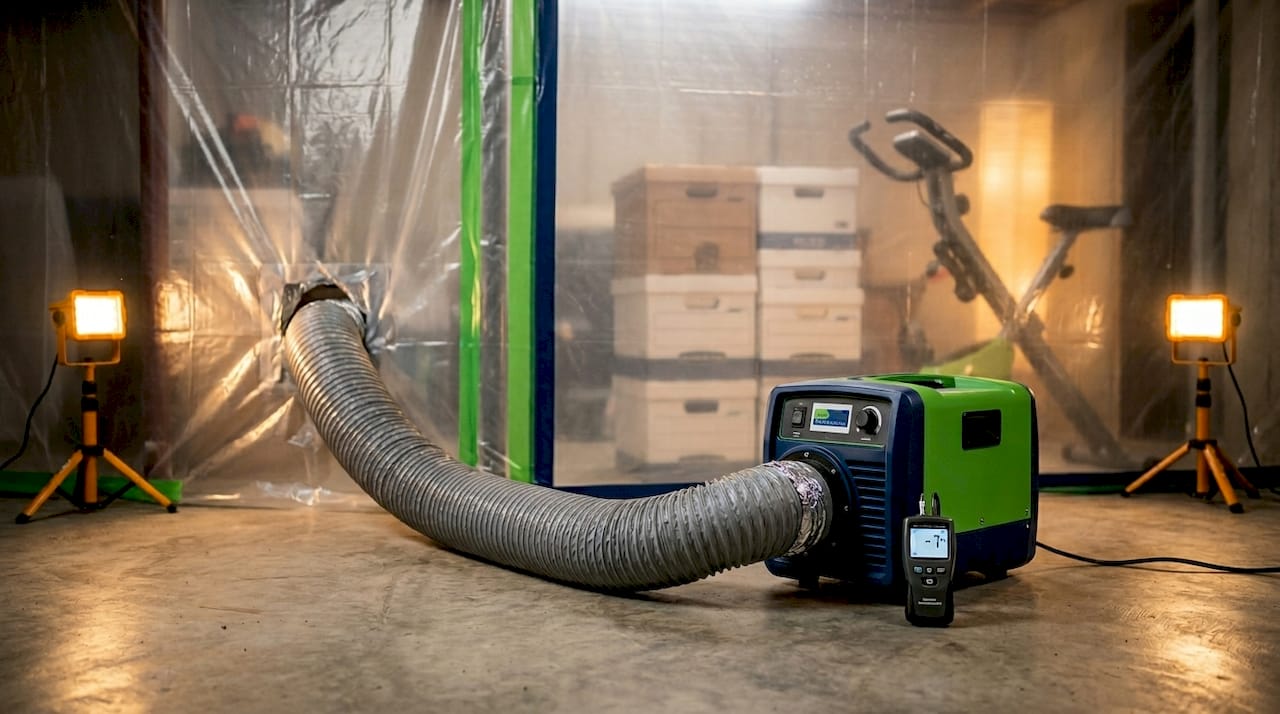
Seal the work area with 6-mil polyethylene sheeting. This is the industry standard material for physical barriers. Crews overlap seams by at least 12 inches and seal every edge with air-tight tape. Tension poles are used to hold sheeting in place against walls and ceilings without penetrating surfaces. For full containment, a second layer goes over the first.
-
Establish negative air pressure with a HEPA-filtered air scrubber. The machine exhausts air from inside the containment zone to the outside of the building, away from any air intakes. This creates a pressure differential that causes air to flow into the containment area rather than out of it, trapping particles inside. The S520 standard requires at least negative 5 Pascals of pressure, measured with a manometer.
-
Seal all HVAC vents, electrical outlets, and air pathways. Every penetration in the containment zone gets covered. Supply vents, return vents, and any gap where air could pass through all need to be sealed with plastic sheeting and tape. An active HVAC system fights the negative air machine and distributes spores throughout the building if left unsealed.
-
Build a decontamination chamber for larger jobs. For contamination areas over 100 square feet, workers need an airlock, which is a small anteroom constructed from plastic sheeting with overlapping flap entries on both sides. Workers decontaminate their gear and suits before exiting so they do not carry spores into clean areas.
-
Require proper PPE throughout the job. At minimum, workers in a full containment zone need N95 or P100 respirators, disposable coveralls, gloves, and eye protection. PPE is not optional when working inside an active containment zone.
Pro Tip: Ask your contractor to show you the manometer reading after negative pressure is established. A legitimate crew will have the equipment and will not hesitate to demonstrate the pressure differential is where it needs to be.
Negative pressure machines must be correctly sized and positioned for the volume of the containment zone. An undersized machine will not maintain adequate pressure, and a machine exhausting into an adjacent space rather than outdoors can move spores into clean areas rather than out of the building entirely.
What happens when containment fails
Poor containment does not just mean a messier job. It actively creates new problems that can cost far more to fix than the original mold issue.
Cross-contamination is the most immediate risk. When containment barriers are incomplete or negative pressure is not maintained, spores released during demolition or cleaning migrate into adjacent rooms, your HVAC system, and finished areas of the home. A crawlspace mold project that contaminates the living area above it can multiply the scope of remediation by three or four times the original job.
The health consequences are real and often underestimated. Fungal fragments outnumber spores by 320 to 1 when moldy materials are disturbed, and these fragments are just as harmful as spores. When containment is inadequate, occupants and workers breathe these particles in concentrations far exceeding outdoor air levels. For people with asthma, allergies, or compromised immune systems, this can trigger serious respiratory reactions.
Some of the most common containment failures that lead to these outcomes include:
- Skipping HVAC sealing or leaving vents partially covered
- Using lightweight poly sheeting that tears or is not properly taped at seams
- Failing to verify negative pressure with a manometer and just assuming the machine is working
- Removing containment barriers before post-remediation testing confirms the area is clean
- Workers moving freely between the containment zone and clean areas without decontamination
“The work is done does not mean the space is clean. Only air and surface sampling can confirm the air quality is safe to reoccupy.” Source: Elite Mold Services
One more critical point: containment alone is insufficient if the original moisture source is still active. Seal the area, remove the mold, verify the results. Then confirm the leak, condensation issue, or water intrusion that caused the problem is fully resolved. Without that step, you will be dealing with the same issue again within months. For a detailed look at how to prevent mold after water damage, that moisture-first mindset is non-negotiable.
Post-remediation verification and clearance testing
Getting containment right during the job is only half the equation. Confirming it worked is what separates professional remediation from a cleanup crew that just makes things look better.
Here is how the verification process works and what the results actually tell you.
| Testing Stage | Method | Purpose |
|---|---|---|
| Pre-remediation | Air and surface sampling, moisture readings | Establish baseline contamination levels |
| Mid-remediation | Visual inspection, moisture checks | Confirm work progress and barrier integrity |
| Post-remediation | Air sampling, surface sampling, visual | Verify spore counts are within normal levels |
The post-remediation test is the most important one. It should happen before containment barriers are dismantled. Taking the barriers down and then testing means any airborne particles that escape during breakdown will contaminate the samples and give you a false reading. Verification should be scheduled as soon as the remediation contractor indicates work is complete, and the barriers should stay up until results confirm the area is safe.
What you want to see in the results: spore counts inside the containment zone should be at or below outdoor baseline levels. Surface samples should show no visible mold growth and no elevated spore concentration. Moisture readings throughout the affected area should be back in the normal range, typically below 16 percent moisture content in wood materials.
Pro Tip: Hire a third-party environmental testing company for post-remediation verification rather than using the same contractor who did the work. Independent verification removes any conflict of interest and gives you unbiased confirmation that the job was done correctly.
Do not accept a contractor’s verbal assurance that the job is finished. Require documentation. Ask for the air sampling report, the surface sampling results, and the moisture readings. These are the records you need if you ever have to make an insurance claim or sell the property.
How to ensure proper containment on your project
You do not need to be a certified industrial hygienist to protect yourself during a mold remediation project. You do need to ask the right questions and know what to look for.
Before work begins, ask your contractor to walk you through their containment plan and confirm it aligns with IICRC S520 standards. Specifically, ask these questions:
- What size is the contamination area and which level of containment does that require?
- What thickness of polyethylene sheeting will you use, and how will seams be sealed?
- How will you establish and verify negative air pressure?
- Which HVAC vents, returns, and air pathways will be sealed and how?
- Will you build a decontamination chamber for worker entry and exit?
- Who will conduct post-remediation verification, and will it be independent of your firm?
Watch for red flags during the job. Workers moving between the containment zone and clean areas without removing coveralls is a sign of poor protocol. Plastic sheeting with visible gaps at floor or ceiling lines, or the absence of a HEPA air scrubber running during demolition work, are serious warning signs. If the contractor resists a third-party post-remediation test or tells you that testing is unnecessary, that is a significant concern.
Pro Tip: Request a written scope of work before the project starts that specifically lists the containment materials, equipment, and verification steps. This protects you if the contractor cuts corners and gives you documentation for your insurance company.
The full mold remediation process involves more steps than just containment, but getting containment right is what determines whether the rest of the work sticks. The best remediation techniques in the world fail if contamination escapes the work zone before or during cleanup.
My honest take on what most people get wrong
I have been on a lot of mold remediation jobs in the Chicagoland area, and the single most consistent mistake I see is homeowners treating containment like a formality rather than the foundation of the entire project.
In my experience, when remediation fails and mold comes back, the root cause is almost always one of two things: the containment was inadequate so spores spread into areas that were never fully addressed, or the moisture source was not corrected and gave mold everything it needed to grow again. Often, both problems are present at the same time.
What surprises homeowners most is how invisible the failure is. The work looks done. The visible mold is gone. The area looks clean. But without verified negative pressure and confirmed post-remediation testing, you have no way of knowing whether spores migrated into your HVAC system, into wall cavities, or into adjacent rooms during the work. I have seen second-floor bedrooms contaminated because a basement remediation project ran an air scrubber that was not properly sized, and it pushed spores upward through the structure rather than pulling them out.
The best thing I can tell you is to insist on third-party post-remediation verification before barriers come down. Every time we have had an independent test confirm our work on a job, it has given the homeowner something no amount of reassurance can replace: proof.
— Jim
Professional mold remediation for Chicagoland homeowners
If you are dealing with mold in your home or a property you manage, the quality of the containment plan your contractor uses will determine whether the problem gets solved or just temporarily hidden. At Zero Water Restoration, we follow IICRC S520 standards on every job, using 6-mil polyethylene barriers, verified negative pressure, sealed HVAC pathways, and third-party post-remediation testing to confirm results before we ever take down a barrier.
We serve homeowners throughout Schaumburg, Arlington Heights, Palatine, Hoffman Estates, Barrington, and the surrounding northwest suburbs of Chicago, with 24/7 emergency response. Our team handles the full scope of the job, from containment setup through reconstruction, and we work directly with your insurance company to keep the process as straightforward as possible. Explore our mold remediation services or call us at (847) 515-7000 for a free inspection and estimate.
FAQ
What is the role of containment in mold remediation?
Containment prevents mold spores and fungal fragments from spreading to unaffected areas during remediation. It combines physical barriers, negative air pressure, and sealed air pathways to keep contamination isolated to the work zone.
How much negative pressure is required in mold containment?
The IICRC S520 standard requires at least negative 5 Pascals of pressure differential inside the containment zone, verified with a manometer, to prevent contaminated air from escaping.
When should post-remediation testing happen?
Clearance testing should occur after remediation is complete but before containment barriers are removed. Taking down barriers first can release particles that skew test results and potentially spread contamination.
Does containment work without fixing the moisture source?
No. Successful remediation requires fixing the original moisture source alongside containment and mold removal. Containment alone will not prevent mold from returning if the underlying water intrusion or humidity problem is left unaddressed.
What size mold problem requires full containment with an airlock?
Contamination areas exceeding 100 square feet require full containment under IICRC S520 standards, including double-layer polyethylene sheeting and a dedicated decontamination chamber for worker entry and exit.